Fitting a fairing - part 3 | |
|
And then it was a saturday afternoon. A day when I had nothing to do,
a day when I, shame on me, was a litttle bit bored. What to do now?
Polish the CX, or is there something to improve at the bike? What is
lying around, oh yeah..... a fairing.....
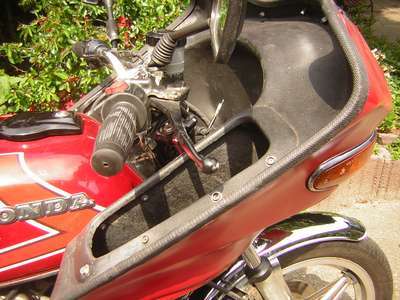
Now it must be done, at last. And I decided that the project "fairing on a CX" must come to an end, finally. Whether I would succeed or, for whatever reason, fail. To say that I started with high spirits is beside the truth. But I started the project, again, with the removal of the radiator hood. And I searched the parts together that I, in the previous weeks, had collected. Two M10x1,25x100 bolds, from a Suzuki dealer, two extension nuts, from Theo J. and four M12 nuts and some carrier-rings from a D.I.Y shop. And ofcourse the fairing supports, that, in the meantime, I had sprayed with Hammerite. The M12 nuts had to act as a extension busses, over the M10 bolds. The end from the M10x100 bold that has to come into the cilinderhead may not be to short, but evenso not to long. First the right-hand side. Unscrew the bottem nut, place the extension-nut, fasten it, ready. Now the upper one. Remove the bold, and think awhile. I place the fairing support onto the extensionnut, and placed the nut loose onto it. And now I had to choose how much space I had to place between the enginesupport, and the frame. I choose one ring, and a M12 nut, and had to place a M12 and a lock washer on the front of the support. The length of supportframe, nuts and rings compensated the extra length from the M10x100. | |
 ... nuts and bolds... |
|
|
Look at that! It fit's, the topside of the fairing-support is reasonbly
level, as suggested by various members of the
Dutch Honda CX-V club told me
Will it fit, finally ?
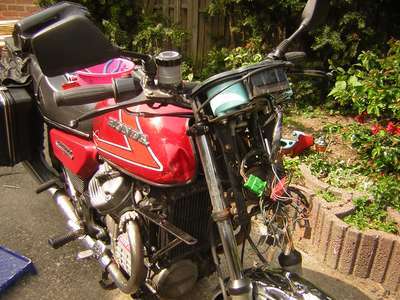
A bit more enthousiastic I started the same procedure on the other side. And soon enough the fairing support was neatly mounted onto the engine. At first sight it looked good, very good. But thed next step was a very big one. remove the headlight, disconnect the meterset, unplug the connectors and finally, rempve the complete headlampunit, with indicators and all. This was the moment of thruth, the point of no return. Does the fairing now fit under the handle bar or not? Can I continue or do I have to rebuild the removed parts back, and place an add on e-bay or something? Let's see were we stand. The fairing was lifted onto the supports, and temporealy secures with one bold. Now does it look, does it fit? | |
 ... does it fit? ... |
|
|
To my relief the fairing did fit under the handlebars. There was
enough space, and I could turn the handlebars without bumping onto
the edge of the fairing. And now this fits, it had become time to go
further, to use the wire cutter and place new connectors.
But first teh tellseszet has to be mounted inside the other frame.
The replacement frame is put into place, and fixed. The tellerset is
placed upon it, and the cables for speed and revelutions are connected
again. Also the plugs for light, contact and switches are placed back.
And now, before I go any further, I have to check the 'nerve system'
of my "red Rascal", and see if the CX still starts. It did, and that is
one thing less to worry about. What is next on my list?
| |
 ... tellerset remounted ... |
|
|
A while ago I had the fairing completly wired, and although not all the
colors are the same as the original honda colors, there is a certain
system in it. I had choosen to keep the connecting wires at a rather
large length, and therefore the fairing could stay on the ground while
I calmly cut all the wires, one by one, put on a new cableshoe and
connect them again. At the end there's one black wire left over, and I
cannot remember what it was meant to do. No problem, when the time
comes, I will know. At this point I can easely remove the fairing, and
have lots of space to work in. Finally I place a nice shining black hood
over the wiring, and that's that.
| |
 ... shining hood ... |
|
|
The fairing supports are equipped with thick rubber layers, cut from an
old car-inside tube. Upon that I place the fairing. It takes some time to
get the bolds through the rubber, but in the end I am successful.
I tighten teh bolds on the left side a bit, then the right side, back
to left, and so on until the fairing is solid mounted on the supports.
The next item is the headlight. The Polaris headlight is a H2, but the
CX headlight is a H4. I have no idea if this shall give problems, but
when that will happenh, I'll woory about it. Until then I place the
lamp in the headlight, connect the wiring, and see a problem. The
parkinglight fitting is a little bit wider as the old one inside the
CX headlight. But a few winds of insulation tape takes care of that problem.
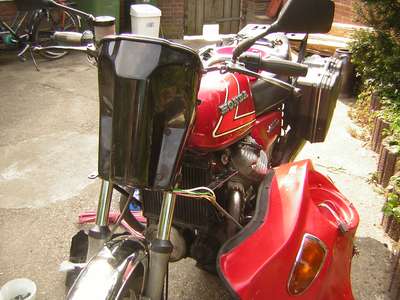
Ready, and almost finist. Only the windscreen must be mounted. The
windscreen is in a very good shape, although is is clear that it is
not made yesterday. On two places there are small cracks through a
mounting hole, but with a very small drill I place a 'end-hole' at the
end of these cracks, so they won't go any further in to the windscreen.
When the windscreen is in place I step back to look at the result. It looks
not bad at al, a CX with fairing, yes, it looks very good!
| |
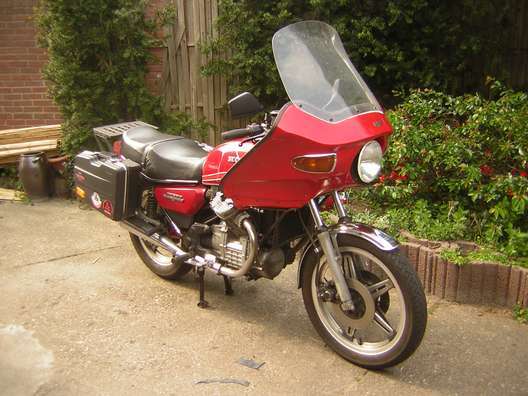 ... CX with fairing ... |
|
|
Part of this fairing are two lowers, but I am not sure if it is wise
to mount them now. With these springtime temparatures they are not
nessecary. A test ride confirmes that thought. I sit comfortably, with
no wind, but it is very warm. The wind blows in a complete different
way across the CX now, and I have to adjust my riding-style a lot to
this way of driving a motorcycle. But it feels so very good ...........
| |
|
|